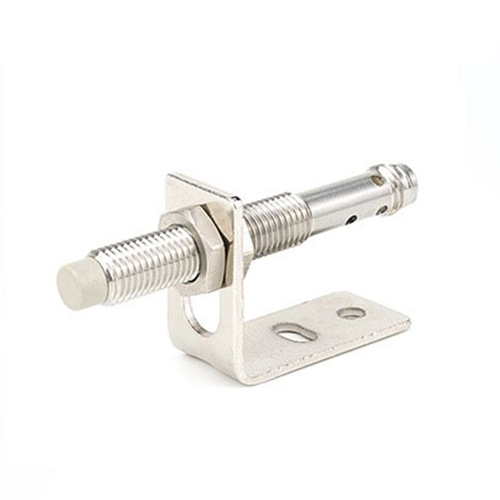
photoelectric sensor mounting bracket
- time:2025-07-25 03:24:13
- Click:0
The Silent Sentry’s Foundation: Why Your Photoelectric Sensor Mounting Bracket Matters More Than You Think
Imagine this: a high-speed packaging line suddenly grinds to a halt. Products are piling up, workers scramble, and the pressure mounts. The culprit? A malfunctioning photoelectric sensor. But dig deeper, and the root cause isn’t the sensor itself – it’s a cheap, flimsy, or poorly installed photoelectric sensor mounting bracket. This small, often overlooked component holds the key to consistent performance and uptime in countless automated systems. Far more than just a hunk of metal or plastic, the mounting bracket is the critical interface that determines how effectively your photoelectric sensor can do its job of detecting presence, absence, position, or colour. Ignore it at your peril.
Photoelectric sensors are the eyes of modern automation. They use light beams to detect objects with incredible speed and accuracy, critical for functions like counting, positioning, quality control, and safety interlocks. However, even the most sophisticated sensor is rendered ineffective if it’s not positioned precisely where it needs to be, held securely despite vibrations, and protected adequately from environmental hazards. This is where the unsung hero, the photoelectric sensor mounting bracket, steps into the spotlight.
Understanding the Core Function: More Than Just Holding On

A photoelectric sensor mounting bracket serves several vital, non-negotiable purposes:
- Precise Positioning and Alignment: The most obvious function. The bracket provides a rigid platform to mount the sensor at the exact height, angle, and distance required for its specific application. Minor deviations in the sensor’s line of sight can lead to false triggers (detection when nothing is there) or missed detections (failure to see an object) – both potentially catastrophic for process integrity. A quality bracket offers fine adjustments (micrometer screws, swivel joints, slotted holes) for pixel-perfect alignment.
- Stability and Vibration Damping: Industrial environments are rarely calm. Machinery vibrations, conveyor jolts, and incidental impacts are constant threats. A robust mounting bracket acts as a stable anchor, minimizing unwanted movement. Vibration resistance is not a luxury; it’s essential for consistent signal integrity and preventing the sensor from gradually drifting out of alignment. Look for brackets designed with dampening features or made from materials that absorb shock.
- Protection: Brackets often provide a first line of defense. They can shield the sensor head from physical damage caused by flying debris, accidental bumps, or even product collisions. Strategic mounting can also help deflect splashes of coolant, oil, or dust away from the sensitive sensor optics, extending its operational life significantly. Protective brackets are crucial in harsh environments.
- Enhanced Functionality: Advanced brackets offer features that go beyond simple mounting. Adjustable mounting arms allow sensors to be positioned over conveyors or into tight spaces unreachable by fixed brackets. Pivot mounts enable quick re-aiming for different tasks or product changes. Multi-sensor mounts consolidate several sensors onto a single, stable platform, saving space and simplifying installation.
Choosing the Right Photoelectric Sensor Mounting Bracket: Key Considerations
Not all brackets are created equal. Selecting the optimal one requires careful assessment of your application’s demands:
- Sensor Compatibility: This is paramount. Brackets are typically designed for specific sensor body styles (cylindrical, rectangular, block-style) and sizes. Ensure a secure fit and that mounting holes/threads align perfectly with your sensor model. Using an incompatible bracket risks instability or damage.
- Material & Durability: The operating environment dictates the material.
- Stainless Steel: Offers superior corrosion resistance, strength, and longevity. Ideal for washdown areas (food & beverage, pharmaceutical), outdoor use, or harsh chemical environments.
- Zinc-Plated Steel: A cost-effective option for general industrial use with moderate environmental exposure. Good strength but less corrosion-resistant than stainless.
- Engineering Plastics (PBT, Nylon): Lightweight, inherently corrosion-resistant, and offer good electrical insulation. Excellent for general automation but may not withstand extreme temperatures or heavy impacts.
- Mounting Type & Location: How and where will the bracket be secured?
- Magnetic Bases: Offer rapid deployment and repositioning on ferrous metal surfaces. Ideal for temporary setups, prototyping, or situations where drilling isn’t feasible. Ensure magnet strength is adequate for the environment (vibration!).
- Fixed Bases: Utilize bolt holes for permanent, rock-solid installations. Provides maximum stability for critical applications.
- Clamp-Type Mounts: Secure onto poles, tubes, or panel edges.
- Flange Mounts: For attaching directly to machinery surfaces.
- Adjustability Needs: How critical is precise, fine-tuning of the sensor’s position?
- Fixed Brackets: Simple, low-cost, but offer no adjustment once installed. Only suitable when positioning is absolutely guaranteed.
- Pivot/Swivel Brackets: Allow gross positioning changes in angle.
- Micro-Adjust Brackets: Feature fine-thread screws for minute, precise adjustments – often essential for reliable long-range or small-object detection. Micro-adjust capability is a hallmark of a high-quality bracket for demanding applications.
- Environmental Factors: Consider exposure to:
- Vibration: Requires inherently rigid brackets, potentially with dampening features.
- Impact Risk: Needs robust construction (thicker gauge metal, reinforced plastics).
- Corrosive Agents: Mandates stainless steel or high-grade plastics.
- Extreme Temperatures: Material selection (avoid plastics near high heat) and potential thermal expansion considerations.
- Washdown/IP Rating: Requires stainless steel brackets with designs that don’t trap moisture, potentially matching the sensor’s IP rating.
Installation Best Practices: Locking in Reliability
Even the best bracket is only as good as its installation. Follow these guidelines:
- Prepare the Mounting Surface: Ensure it is clean, flat, and free of debris or oil that could compromise grip (for magnetic) or allow movement (for bolted).
- Secure the Bracket Firmly: Tighten all bolts or clamps to the manufacturer’s specified torque. For magnetic bases, clean the surface and verify strong adhesion. Avoid over-tightening plastic components.
- Position & Pre-Align: Mount the sensor into the bracket and position the assembly roughly where needed. Hand-tighten just enough to hold position temporarily.
- Perform Fine Alignment: This is critical! Use the bracket’s adjustment mechanisms. Activate the sensor (many have alignment indicators/LEDs) and carefully adjust position, angle, and height until you achieve a strong, consistent signal on the target object. Take your time here. **Thorough alignment is the single most important

